We managed to complete the joint taping yesterday.
I was a little concerned before starting as the weather has started to turn chilly here in the UK and temperatures in my area were around 16c. This is getting be around the lower limit that West Systems recommend their slow harder to be used at. Below this it may not cure, given my previous experience of curing problems I was feeling edgy.
However we needed to get it done as the weather is supposed to get worse here for the beginning of next week, so I wanted to get the taping done and give it a while to cure before doing the main hull fibre glassing at the end of next week. Weather window pending.
I also wanted to get the taping done all in one go. There are a number of joint meeting points so there is quite a bit of overlapping of fibre glass tape where joints meet. I wanted to let them all chemically bond and cure together.
It was a full day job. I have never fibre glassed before and despite consuming an epic amount of Youtube videos there is nothing like doing it yourself and I confess to being nervous. Principally because if I got it wrong it would be a huge amount of work to remove it and do again.
To try and promote the exothermic reaction needed for curing we mixed the resin and harder together for longer and left it in the small pot, only pouring small amounts onto the paint tray when it was actually needed. Once it was poured in the paint tray it slows down it’s setting time, which is great for giving you time to apply it to the tape, but I was conscious of not affecting its curing given the relatively low temperatures.
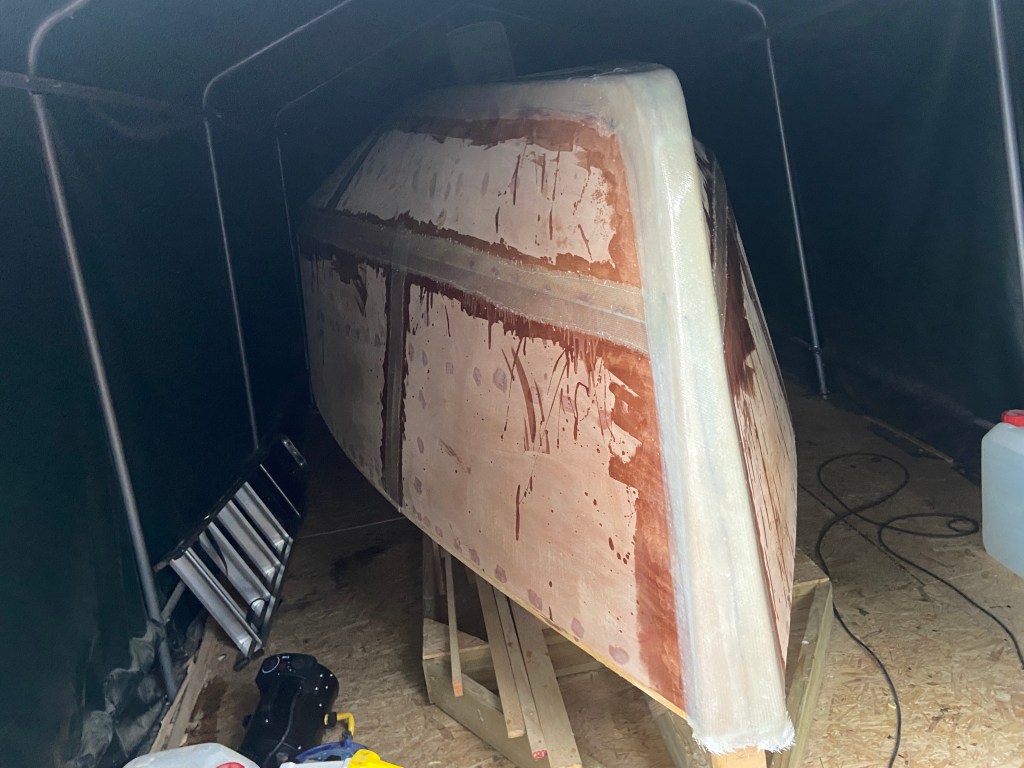
I had bought peel ply to use on the finished tapes. However by the time I had got around the boat and finished the last tapes the first ones had already cured to solid, not fully cured to strength, but completed its initial cure. So I decided not to use the peel ply. The impact of this will be some washing down (to remove potential Amine Blush) and sanding to promote the mechanical bonding before putting on the main glass. That said the edges of the tapes are quite rough so I would have ended up with some sanding anyway even with the peel ply.
We used Biaxial woven glass. Some I bought as 150mm tape and some as a sheet I cut down for the 100mm needs. I found it reasonably workable across the corners and it took the epoxy well. We used the 2 phase method. Wetting the plywood area first with epoxy, then laying on the tape. Wetting the plywood first gave a initial “fix” for the tape so that when working on the vertical hull sides the tapes would stick to the wetted area before going back and filling in with epoxy.
We generally used a small roller to apply the epoxy. You could easily see the tape taking up the epoxy. I guess we applied a first pass of epoxy, quite generously. Within a short period the tape became translucent and you could see air pockets or areas that need more epoxy. A plastic squeegee could be used to remove the air but it generally came out with the rolled. Then another pass of the roller got the additional epoxy in until the glass looked evenly wetted.
We got a good level of overlapping of tape on the bow by extending fthe tape from the “bottom to hull side” joint. We then placed another layer of the 150mm tape over the bow to complete. So the bow has at least three layers of 600g glass across virtually its whole area already.
As the temperature started to drop we decided to call a halt to the day before we managed to do the reinforcement for the skeg and the daggerboards. But these should not take long.
To help the curing along we put a heater in the tent to help keep temperatures up a bit and wrapped her up for the night.
This morning all seems (no pun intended) to have cured nicely. Another big job done and we have crossed to fibre glass knowledge bridge a little further. In total taping the joints took about 5 hours of me working alone and then another two with the Mrs helping. A full day job.